Fun Things to Do with CSS
Photographs
Photographs are a lot like buttons, they're INLINE elements so you can actually center them with the text-align command in CSS but when you start making changes to the way you display them, you sometimes need to tell the browser to display them as BLOCK or INLINE-BLOCK elements.Pile of Polaroid Snapshots (Scroll down below the block of 12 photos and hover your pointer over the pile of photos on the right.)
Simple album with a hover effect (There is no table on this page.)
Using CSS to create shaped photos
We start with the simple code <img>.
Images and line breaks do not need separate closings so we used to put the slash at the end of the command <img/> <br/>. HTML5 has taken us back to the basics and we no longer have to close line breaks and images.
If you don't use CSS, you add height, width, alternate text, borders, titles and any other formats inside this <img> tag.
With CSS, you put most of it in a style <img style="">.
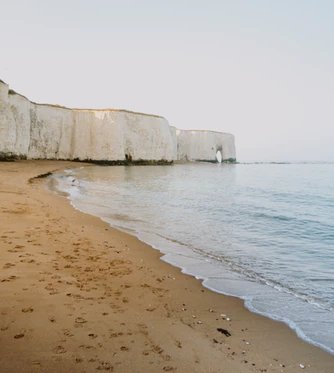
I'm going to start a simple photo with no styling. <img src="images/beach01.jpg">
I still put my alt text and my title inside this tag since most often they'll be specific to the
image. <img src="images/beach01.jpg" alt="Kingsgate Bay, Broadstairs" title="Kingsgate Bay, Broadstairs, UK">
(In order to keep it simple, I'll leave alt and title off for the rest of this tutorial.)
I prefer to display my full-size images in a separate WINDOW so I've added a link to OPEN the photo instead of displaying it on this page.
<a href="demo/images/beach01.jpg" target="other">Kingsgate Bay, Broadstairs, UK</a>
But if I want to add some styling or a caption, I need to open it in a separate PAGE.
<a href="demo/photo.htm" target="other">Kingsgate Bay, Broadstairs, UK</a>
So what kind of styling do we want to add?
The simplest is to restrict the size width: 300px;
and the height. height: 335px;
I want to center it, so I add a <div></div> around it and tell the div that I want to text-align: center;
I would like to add a border to make it look like one of those old Polaroid snapshots. border: 20px solid White;
Those old Polaroid shots had a bigger border on the bottom for a caption so I'll make a change. In CSS, when styling a border, the order is TOP-RIGHT-BOTTOM-LEFT. border: solid White;
border-width: 20px 20px 3em 20px;
To give it a 3-D effect, I add a drop shadow like I did with the buttons. box-shadow: 2px 2px 5px Black;
Now, I have a place to add a caption. <caption></caption>
But I want that caption to be inside the white border so I add another HTML5 element called <figure></figure> around my image
<figure><img></figure>
and change to one called <figcaption></figcaption> around my caption.
<figcaption>Kingsgate Bay, Broadstairs, UK</figcaption>
This will center the caption under the photo and its border but we want it to actually be OVER the bottom border so we're going to use a negative margin to push the caption UP. margin-top: -3em;
The code on the target page looks like this.
<figure style="width: 300px; height: 335px; border: solid White; border-width: 20px 20px 3em 20px; box-shadow: 2px 2px 5px Black;"><img src="images/beach01.jpg">
<figcaption style="margin: -3em;">Kingsgate Bay, Broadstairs, UK</figcaption></figure>
Note that </figure> goes AFTER</figcaption>.
Thumbnails
It used to be quite tedious to create a page of thumbnails. The main reason we did it was because the Internet was so slow, we didn't want our pages to take forever to load. But with faster Internet and CSS, we don't have to create a separate thumbnail for each photo in an album.We start with our <img>.
Since we're going to display it on THIS page, we add the source instead of a link. <img src="images/beach01.jpg">
Add some style. <img src="images/beach01.jpg" style="">
We want it to be small so we add size restrictions. height: 100px; width: auto;
The auto size can be used for either height or width to keep the proper aspect ratio, it just depends on what you want to do with it. If you have photos that are different sizes and you want to create an album with perfect rows and columns, you want to use a number instead. The thumbnail may be a little distorted but with small sizes, it won't be very noticeable. For our purpose, I use auto because I'm not aligning it.
If you have a table for your thumbnails, such as a cemetery photo page, you might want to auto size the height so that all your photos can be the same width. height: auto; width: 100px;
If this thumbnail is going to link to the original or to a page, you add the link.
<a href="images/beach01.jpg" target="other"><img src="images/beach01.jpg" style="height: 100px; width: auto;"></a>
And now we have a clickable thumbnail without having to shrink the original in a graphics program.
