Basic CSS Tutorial
Creating A CSS File
A CSS file is just a text file that you've named with the .css extension instead of .txt. NotePad will allow this in most versions of Windows, I'm not sure about TextEdit. If you forget to change the extension (or can't), just open the folder where it's located and rename it there.I know that, right now, all this code is going to look like gibberish and it can look overwhelming at first. But if you practice each lesson several times, you'll start recognizing items and being able to read the gibberish. I usually start a formatting sequence with a very basic line and then add the components one at a time until I have what I want. Trying to type it all into a class at one time is too complicated and, if make a typo, I have a harder time finding it. My most common mistakes are using ( instead of { and forgetting to put the semi-colon at the end of a value, especially when I put the whole thing on one line. I have a hard time remembering that there is no font-color - it's just color. Some formatting for fonts starts with text instead - text-decoration. I've spent hours trying to figure out why a complicated style isn't working only to finally notice that I forgot to put a semi at the end of one of the values or my ending curly bracket is actually a parentheses. So these days when I start a line that requires a closing I do that first <div></div> or .color {;} - especially links <a href=""></a>. Then I can add the complicated stuff without worrying that I'll forget to close. I'm also the queen of copy/paste; I have a file that contains the items I use most often and I can simply copy and paste them to whatever I'm working on.
Basically, you type in the property and the value you want. You don't need to memorize all the properties and values, you can Google something like CSS border property and choose the link for the W3 school to find a page that tells you all about it.
Let's Get to Work
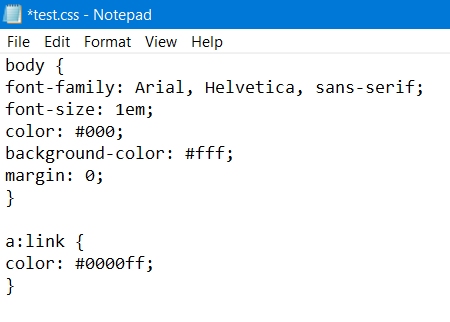
 The first part of your CSS file should contain the basics. The style for your body and links should go first. After
those, you should always alphabetize your styles so you can find them easier. Since I'm lazy, I usually open a CSS file
that works and copy the parts I want, generally the body, links and horizontal line break. So this page will use Arial
font, the text size is 1 em (the default size for the visitor's browser), the font color is black, background is white
and links are blue. I've also set the margin to 0 (zero); there is a default margin for the BODY tag of 8 pixels all the
way around. I want my page to cover all the available space in the browser.
This is how I type my CSS files so that they're easy to look through. For the rest of this tutorial, some will be smashed together so I can fit more in my images and the pages aren't so long. I have a sample file here so you can see that I do take pains to make them neat. You can copy this sample to your CSS file and change it to suit your tastes.
You'll see that I've added two "classes" before I even get started - bold and color. Sometimes I want to emphasize a word or phrase so I always add these classes to my style sheet. I use the word color (instead of blue) for my class so I can change it without feeling silly if it's actually red or green. You can name your classes anything you want. I like descriptive names. If you use a multi-word name, either run them together "blueborder" or separate the words with a - dash, CSS doesn't recognize that "blue border" is one class; it has to be "blue-border". Now when I want something to stand out, I can wrap it in a span and add one or both of these classes. You'll want to add a class to center text.
.center {
text-align: center;
}
I also have the a img style in my link section <a> - now I don't have to type border="0" on each of my linked images.
If you have a very complicated class or special set of classes that you want to keep together (maybe a really nice menu), or you have to add something out of alphabetical order, you can add COMMENT lines to your CSS file. (I recently needed to find a class called content for an iframe but it was in the Is instead of the Cs so I added a comment line in the place where I expected to find it. Next time, I'll know to look under iframe.) So far, our CSS file is very short but it could possibly grow to thousands of lines for a large website so comment lines and alpha ordering are very useful.
Use a slash and an asterisk to open the line, then reverse them to close it. In a very large CSS file, you might want to use uppercase for your comments.
/* This is a comment line */
Remember the word LINE, a comment line is only ONE.
/*IF YOU NEED SEVERAL LINES FOR YOUR*/
/*COMMENTS, YOU'LL NEED TO START AND*/
/*end each line with this special*/
/*combination of characters.*/
This also provides a way for you to make notes in your CSS file while you're learning. You can add them above and below a group:
/* My fancy menu starts here*/
/* My fancy menu ends here*/
or you can add them to the right side of your styles:
.center {
text-align: center; /*THIS IS FOR CENTERING TEXT INSIDE A BLOCK*/
}
(Pretend that all my square brackets [ ] are actually angle brackets < > so I don't have to type < all the time.)
There are three ways to classify your CSS items. The first is a CLASS. [span class="bold color">
In your CSS file, a class name begins with a period - .bold and .color.
The actual formatting begins and ends with curly brackets {}
.bold {font-weight: bold;}
the PROPERTY name (font-weight) is always followed by a colon and the VALUE (bold) is always followed by a semicolon.
.color {color: blue;}
Next is an ID. [div id="header">
You can only use this specific id ONCE per PAGE but you can use it on EVERY PAGE and you can use multiple ids on a page. If in doubt, use class instead.
An id always starts with the pound sign - #header and #footer - and the rest of it is just like a class.
#header {background-color: blue;}
The id can also be used as an anchor - i.e. when you want a link to a specific place in a page. Using [a href="lesson2.htm#go-here"> and [a id="go-here" href="samples/sample2.htm">How it looks[/a> would take you back to the bottom of the previous page.
 The last one is a TAG for use when you want every item of that type on your site or page to have the same properties, in which
case, you don't need to add anything to the tags on your HTML page.
In your CSS file you type the name with no leading character - a:link and img.
a:link {text-decoration: none;}
img {width: 300px; height: 300px;}
This means NO link on your site will have an underline and EVERY image will be 300x300 pixels.
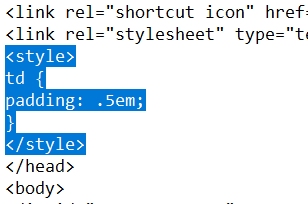
Before you do this, know that it can be a problem if you start uploading a lot of pictures of different sizes so you need to plan ahead. Other than links and the hr, I usually only use this in the HEADs of pages with tables where I want all the cells in the table to have the same properties. I used it on this tutorial to 'float' all my images to the right and put a red border on the left sides (and I've had to add style to the heads of a couple of pages to unfloat and remove borders).
td {padding: .5em;} is almost a standard for me - it adds just a little white space around the contents of every table cell on my page.
So any container on your site can be formatted; all you have to do is add a class or id.
<div id="header"> <img class="thumbnail"> <h1 class="center">
How it looks. The font has changed to Arial.
Previous Next